How to Install Your Composite Decking
Why choose composite decking?
Composite decking is natural wood that is combined with other materials to enhance durability and colour fastness.
It is ideal for patios, terraces, balconies, and the like, and is also perfect around the pool. It doesn’t require finishing, and the only maintenance you need to perform is to wash the boards when necessary. In addition, the surface is barefoot friendly since there are no screws – and no risk of splinters or cracks.
Planning and preparation
Composite decking must be installed on surfaces with good air circulation and with a runoff slope of at least 2-3%, so that water does not pool. Leave a space on the sides of at least 2 cm at all walls, railings, and other permanent objects. Remove any product labels from the boards.
Plan floor laying well to minimise waste and to achieve the fewest possible joints. Mix the boards since they can vary slightly in colour. The temperature should be between +10 and +30 °C during installation.
Before installation
Store the composite boards on-site for a few days before installation so that they can acclimate to the environment in which they will be laid. Store the boards so that they are protected from direct sunlight, rain, moisture, and the like. Stack the boards flat on two beams with a maximum distance of 30 cm.
Tools and equipment you may need:
- Safety glasses, hearing protection, and gloves
- Measuring tape, steel square, spirit level and carpentry pencil
- Circular saw, crosscut saw/mitre saw, sawhorse
- Drill and screwdriver
- Wood screws (to secure the decking strip)
Installation
The composite boards can be laid with any side – either smooth or grooved – upwards. Use starter clips along the outer long sides of the boards and fit the clips between them. Lay the boards in place and align the longitudinal grooves with the clips. Both ends of the board should rest on a beam, and they should not protrude more than 20-30 cm.
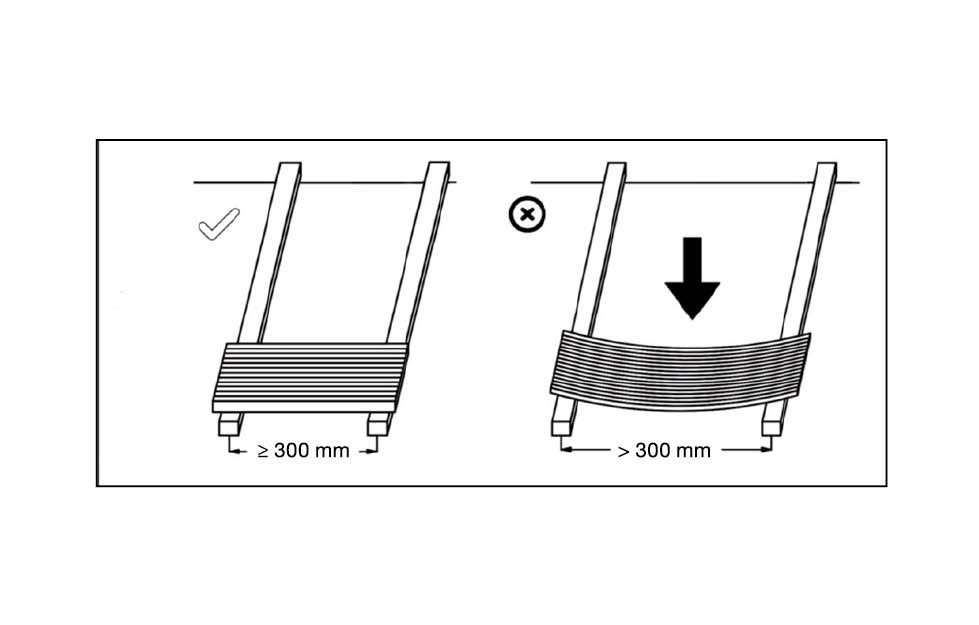
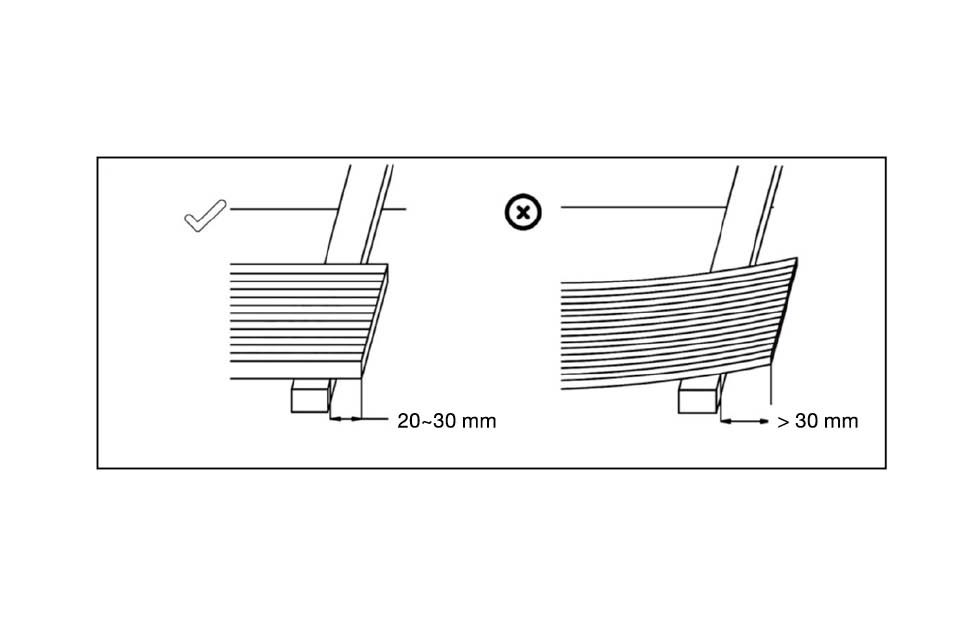

Fig. A
- Composite boards must be installed on a surface with good air circulation and with a runoff slope of at least 2-3%, so that water does not pool.
- Place the beams in the substructure with a centre distance of max. 30 cm. The distance between the beams and the wall should be at least 2 cm.
Fig. B
- Mark the position of the starter clips on the beams and make sure they are in a straight line. Then tighten the starter clips.
- Slide the first board into place against the starter clips.
- Leave a space on the sides of at least 2 cm at all walls, railings and other permanent objects.
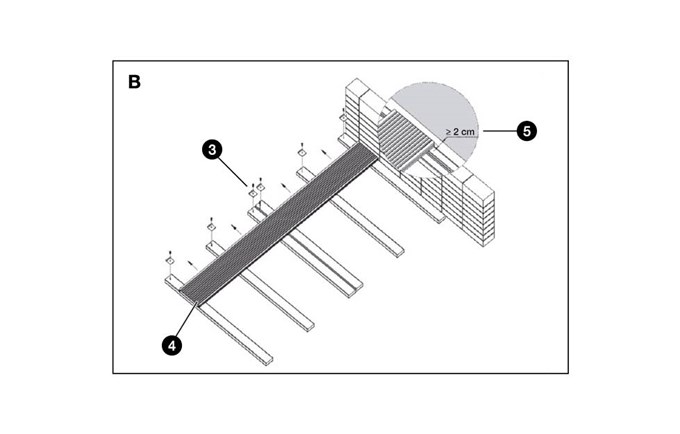
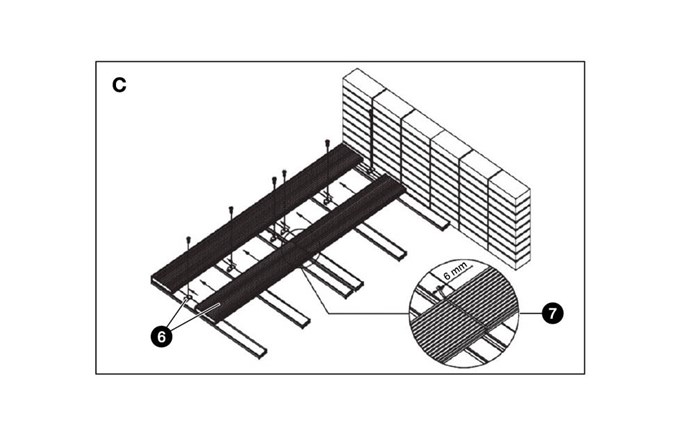

Fig. C and D
- Next, slide the boards into place one by one using mounting clips fitted between each row. The mounting clips automatically create a space of 7 mm.
NB! The mounting clip screws must not be tightened too hard during installation. They should only be screwed tightly when all the boards have been laid.
- For longitudinal joints, there should be 6 mm gaps, allowing the boards to expand. Use a suitable block to ensure equal distance. If a beam at a joint is too narrow for both mounting clips to fit, attach an extra piece of beam to the existing beam.
Fig. E
- Fit the outer board’s starter clip. The outer edges of the starter clips must be placed 154 mm from the edge of the second outer board and screwed in.
- Insert the groove in the outermost board into the starter clip and lay down the board.
- Fit the mounting clips between the two outermost boards and screw them to the beams as before.
- Once all the boards are in place, firmly re-tighten all the mounting clips between the boards. Another option is to lay the last row of boards as before, then pre-drill and use a stainless steel screw to secure the longitudinal groove on the outermost board to the underlying beam.
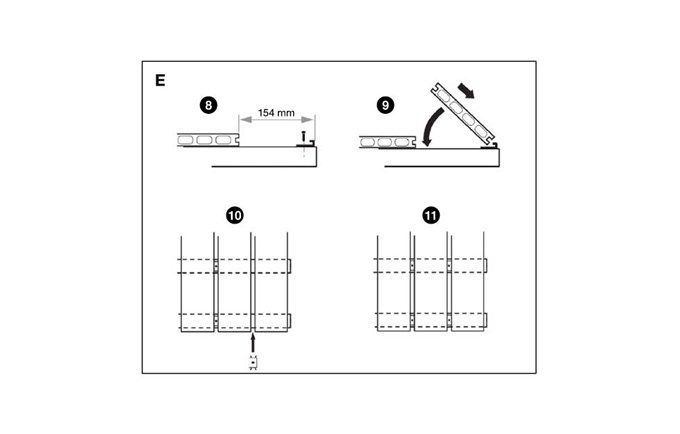

Fig. F
- To get a smooth edge along the ends of the boards, you can cut them using a handheld circular saw with a guide rail.
- To cover the grooves and cavities in the outer boards, fit decking strips around the entire deck or fit end caps on the short sides of the boards, depending on the appearance and placement of the deck. The decking strips can be fitted with any side outwards – smooth or grooved.
Pre-drill and use e.g. a recessed wood screw to secure the decking strips. To prevent cracking, do not screw closer than 25 mm from the edge of the board. The end cap must be attached with weatherproof mounting adhesive.

Maintenance
All material used outdoors must be maintained. To maintain their appearance, the composite boards must be cleaned once every six months. Remove leaves, pollen, dirt, and the like. Use a hard-bristle brush and wash with soap and warm water. A high pressure washer with a soft brush can be used with caution in order to remove stubborn stains and dirt, but never spray the water jet directly on the deck.
If you live in a climate with more pollution, more frequent cleaning may be needed.
To make them even more durable, the composite boards can be impregnated. This makes it more difficult for algae to take hold, which is common in north-facing/shady areas. Impregnation also ensures that the composite does not bleach as easily, especially in sunny/south-facing areas.